Field Service - Jobs
You use the Jobs menu option under the FIELD SERVICE menu to review the jobs that have been assigned to you and to record all the job details such as:
- your job start and end times
- materials and labour used on the job
- the customer's signature at the end of a job.
The Job Wizard guides you through the process of reviewing jobs, travelling to jobs, entering job materials, labour and miscellaneous charges, and capturing the customer's signature.
This diagram shows the main screens in the Job Wizard. More detail is provided below and in the following sections of this manual. Reviewing this diagram will help you to gain an understanding of the basic process.
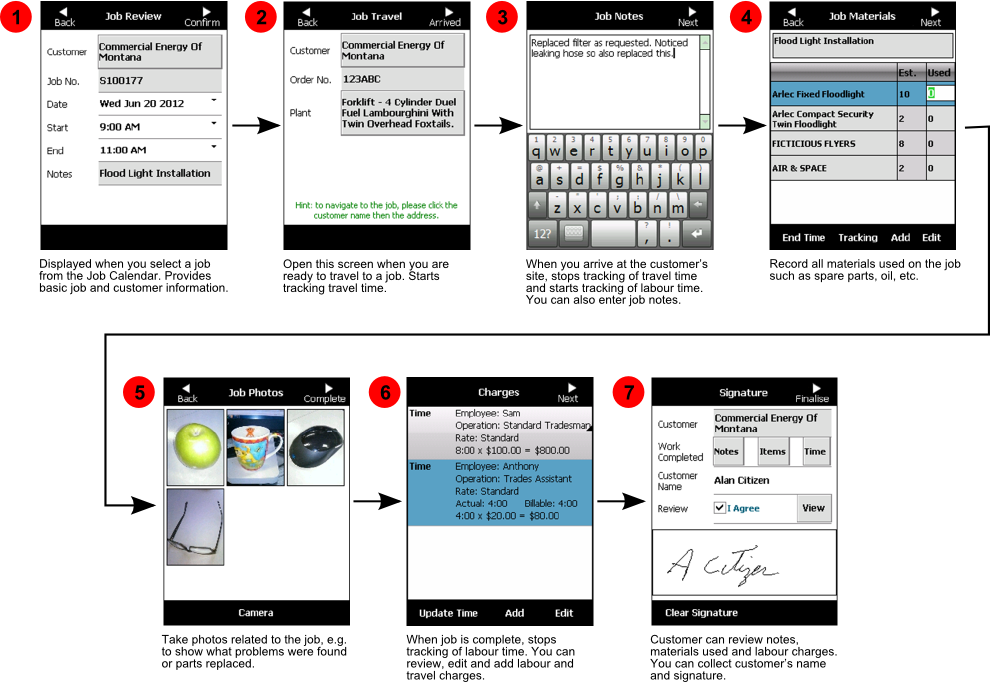
Job Wizard Overview
- Job Review - This screen is displayed when a job is selected from the Job Calendar. It provides basic information about the job. You might like to select each job in turn and have a quick look at this screen to get a feel for the jobs that are coming up soon. It allows you view customer details by tapping the customer name and also to reschedule the job if required.
- Job Travel - You should open this screen when you are ready to travel to a job. It will automatically start tracking of travel time. You can also select the customer to start “turn by turn” navigation to help drive to their location.
- Job Notes - Open this screen when you arrive at the customer’s site. This stops tracking of your travel time and starts tracking of your labour time. You also use it to enter notes about the job. While working on the job you can move back and forward between the Job Notes screen and the following Job Materials and Job Photos screens. In this way you can write a note relating to the current task, add the materials that you used, take a photo then continue on to the next task in the job.
- Job Materials - Use this screen to record all the materials you used on the job such as spare parts, oil, etc. You can also add a short note that may be associated with a particular material item.
- Job Photos - Use this screen to take photographs of the job. This is useful to explain to the customer exactly what problems were found or parts replaced.
- Labour Charges - You should open this screen when all work is complete to stop tracking of your labour time. You use this screen to review the calculated labour and travel charges and edit them as required. You may also use this screen to add labour charges for other staff members who may be in attendance.
- Job Review and Signature - This is the final screen in the Job Wizard. It is displayed when you have finished entering all data for the job. The customer can use it to review your company’s terms and conditions, and to view your notes, list of materials used and labour charges.You use it to collect the customer’s name and signature.